In this weekly blog series about Cat and Mice, I will discuss the whole process, from design to implementation, from publishing to artificial intelligence. Cat and Mice is a game that is played on a checkers board. One player plays the cat and has only one piece. The piece of this player starts at one side of the checker’s board. On the other side are four pieces of the mice. The goal for the cat is to reach the other side of the checker’s board. The goal for the mice is to prevent this. This third article will discuss the implementation of the game logic.
About this blog series
This blog series will follow me along in the making of a simple game with Flutter. Not just the technical parts but also everything that happens around the implementation.
Implementing the game menu
Last blog post, I briefly discussed implementing the main menu and how to get to the board page. The menu works a bit differently now, as that was only an example. If you press play in the main menu, this will bring you to the game menu. In the game menu, users can select some properties about the game, such as whether it is a single or two-player game, if it is a single-player game, the difficulty of the AI.
For these settings, I create a model that contains all the information I need for the screen. The player is an enum that differs between HUMAN and COMPUTER. The difficulty contains all the difficulty settings I currently have. Finally, I have an error boolean. This is true when there is an error during the setup. This happens when both players are set to the computer. When there are more different errors, I would have made this a nullable enum.
class GameMenuSettings {
  final Player mice;
  final Player cat;
  final Difficulty difficulty;
  final bool error;

  GameMenuSettings(this.mice, this.cat, this.difficulty, this.error);

  GameMenuSettings copyWith(
      {Player? mice, Player? cat, Difficulty? difficulty, bool? error}) {
    return GameMenuSettings(mice ?? this.mice, cat ?? this.cat,
        difficulty ?? this.difficulty, error ?? this.error);
  }
}
I create a Riverpod provider that maintains the state of the settings. Furthermore, I need a view model that can access the routing service and the screen settings. This is the same setup I used for the main menu described in the previous blog post.
final _settings = StateNotifierProvider<SettingsNotifier, GameMenuSettings>(
    (ref) => SettingsNotifier(GameMenuSettings(
        Player.HUMAN, Player.COMPUTER, Difficulty.NORMAL, false)));

final settings = Provider((ref) => ref.watch(_settings));

final gameMenuViewModel = Provider<GameMenuViewModel>(
  (ref) => GameMenuViewModel(
    ref.watch(routingService),
    ref.watch(_settings.notifier),
  ),
);
This is the actual view model. The view model provides multiple actions for the game menu. For example, two actions deal with navigation between screens: the back and play button. For those actions, there is a call to the routing service.
class GameMenuViewModel {
  RoutingService _routingService;
  SettingsNotifier _settingsNotifier;

  GameMenuViewModel(this._routingService, this._settingsNotifier);

  void initialize() {
    _settingsNotifier.updateMice(Player.HUMAN);
    _settingsNotifier.updateCat(Player.COMPUTER);
    _settingsNotifier.updateDifficulty(Difficulty.NORMAL);
  }

  void updatePlayer(PlayerType type, int index) {
    switch (type) {
      case PlayerType.MICE:
        switch (index) {
          case 0:
            _settingsNotifier.updateMice(Player.HUMAN);
            break;
          case 1:
            _settingsNotifier.updateMice(Player.COMPUTER);
            break;
        }
        break;
      case PlayerType.CAT:
        switch (index) {
          case 0:
            _settingsNotifier.updateCat(Player.HUMAN);
            break;
          case 1:
            _settingsNotifier.updateCat(Player.COMPUTER);
            break;
        }
        break;
    }
  }

  void updateDifficulty(int index) {
    switch (index) {
      case 0:
        _settingsNotifier.updateDifficulty(Difficulty.EASY);
        break;
      case 1:
        _settingsNotifier.updateDifficulty(Difficulty.NORMAL);
        break;
      case 2:
        _settingsNotifier.updateDifficulty(Difficulty.HARD);
        break;
    }
  }

  void play() {
    if (_settingsNotifier.settings().cat == Player.COMPUTER &&
        _settingsNotifier.settings().mice == Player.COMPUTER) {
      _settingsNotifier.setError();
    } else {
      _routingService.toBoardGame(_settingsNotifier.getAISettings());
    }
  }

  void back() {
    _routingService.back();
  }
}
I can access the game view model on the page. Here I use the useEffect hook to initialize the settings. Furthermore, all Widgets are placed on the page. Each Widget has access to the view model, so there is no need to pass anything around.
class GameMenuPage extends HookWidget {
  @override
  Widget build(BuildContext context) {
    useEffect(() {
      Future.delayed(Duration.zero, () {
        context.read(gameMenuViewModel).initialize();
      });
    }, []);
    return DefaultPage(
      Center(
        child: Column(
          mainAxisAlignment: MainAxisAlignment.spaceEvenly,
          children: [
            SettingsWidget(),
            GameMenuButtonsWidget(),
          ],
        ),
      ),
    );
  }
}
For example, here is the DifficultyWidget. I use the toggle switch package to create a toggle between the three different difficulties. To handle the clicks, the on-click method is going to need to access the view model. I can call the viewModel.updateDifficulty(index). As you can see, there is no need for the logic in the Widgets this way.
class DifficultyWidget extends HookWidget {

  @override
  Widget build(BuildContext context) {
    final viewModel = useProvider(gameMenuViewModel);
    return Row(
      mainAxisAlignment: MainAxisAlignment.center,
      children: [
        Expanded(
          flex: 1,
          child: Container(),
        ),
        Container(
          width: 120,
          child: Text(
            "Difficulty",
            style: TextStyle(fontSize: 18),
          ),
        ),
        SizedBox(
          width: 10,
        ),
        ToggleSwitch(
          fontSize: 15,
          minWidth: 80,
          activeBgColor: [Colors.green],
          activeFgColor: Colors.white,
          inactiveBgColor: Colors.grey[350],
          inactiveFgColor: Colors.white,
          totalSwitches: 3,
          initialLabelIndex: 1,
          labels: ["Easy", "Normal", "Hard"],
          onToggle: (index) {
            viewModel.updateDifficulty(index);
          },
          animate: true,
          curve: Curves.fastOutSlowIn,
        ),
        Expanded(
          flex: 1,
          child: Container(),
        ),
      ],
    );
  }
}
Another example is the error Widget. This displays an error when both the players are set to play as computers. This is not possible, so there will be an error. As you can see in the model, this is a boolean field. The Widget is watching the value of that boolean field and will show the error when the field is true.
class GameMenuErrorWidget extends HookWidget {
@override
Widget build(BuildContext context) {
final menu = useProvider(settings);
if (menu.error) {
return Container(
height: 40,
child: Padding(
padding: const EdgeInsets.only(top: 16.0),
child: Text(
"No player selected",
style: TextStyle(fontSize: 18, color: Colors.red),
),
),
);
}
return Container(
height: 40,
);
}
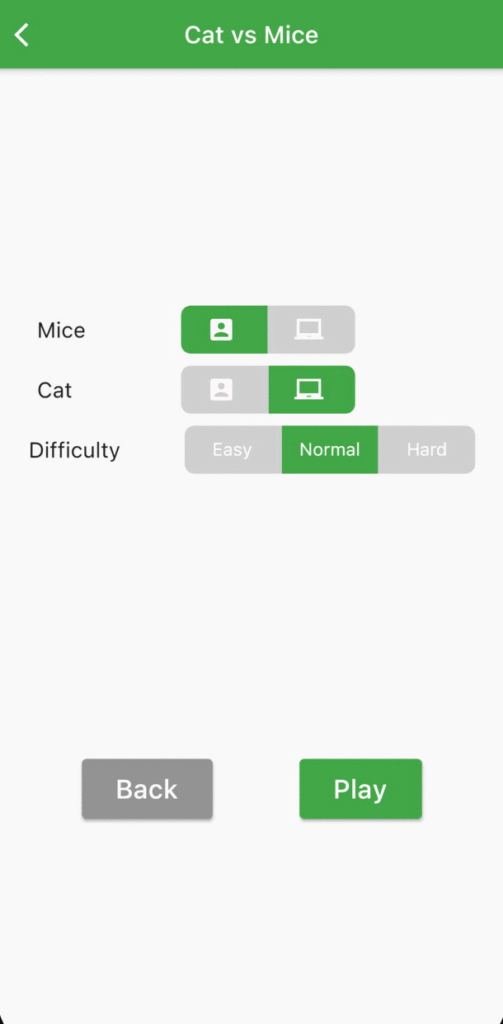
}This will result in the following page:
Implementing the game logic
As described in the blog post about the state management of drag and drop, I create multiple providers which the view model can access. One is maintaining the state of the checkers; the other is maintaining the state of the current player. Finally, there is a provider that makes the view model accessible to the Widgets.
final _currentPlayer = StateNotifierProvider<PlayerNotifier, PlayerType>(
    (ref) => PlayerNotifier(PlayerType.MICE));
final _checkers = StateNotifierProvider<CheckerNotifier, List<Checker>>(
    (ref) => CheckerNotifier([]));

final currentPlayer = Provider((ref) => ref.watch(_currentPlayer));
final checkers = Provider((ref) => ref.watch(_checkers));
final boardGameViewModel = Provider<BoardViewModel>(
  (ref) => BoardViewModel(ref.watch(_checkers.notifier),
      ref.watch(_currentPlayer.notifier), ref.watch(routingService)),
);
The view model provides multiple functions to the Widgets. Most importantly, the start of the drag and drop. The finish will check if one of the players has won the game, but only if it is a valid move. When this is the case, the board game view model calls the routing service to show the dialog with the winner.
class BoardViewModel {
  RoutingService _routingService;
  CheckerNotifier _checkersStateNotifier;
  PlayerNotifier _playerNotifier;

  BoardViewModel(
      this._checkersStateNotifier, this._playerNotifier, this._routingService);

  void initialize(AISettings? aiSettings) {
    _checkersStateNotifier.initialize();
    _playerNotifier.initialize();
  }

  void startDrag(Checker selectedChecker) {
    _checkersStateNotifier.startDrag(selectedChecker);
  }

  void cancelDrag(Checker selectedChecker) {
    _checkersStateNotifier.cancelDrag(selectedChecker);
  }

  void finishDrag(Checker selectedChecker, Coordinate coordinate) {
    if (coordinate != selectedChecker.coordinate) {
      _playerNotifier.updatePlayer();
      _checkersStateNotifier.finishDrag(selectedChecker, coordinate);
      final winner = GameLogic.playerWon(_checkersStateNotifier.getCheckers());
      if (winner != null) {
        _checkersStateNotifier.initialize();
        _playerNotifier.initialize();
        _routingService.openPlayerDialog(winner);
      }
    }
  }

  bool canMoveTo(Checker selectedChecker, Coordinate coordinate) {
    if (selectedChecker.type != _playerNotifier.getPlayer()) {
      return false;
    }
    return GameLogic.possibleMoves(
            selectedChecker, _checkersStateNotifier.getCheckers())
        .any((c) => c == coordinate);
  }
}
The view model’s widgets are described in this blog post. Instead, you can look at that blog post or in the code how it is coming together.
For the game logic, I have created a class with static methods. This class should contain no state, as the game logic never changes. Thus, there is not much duplicate use of the game logic, but this will probably change when implementing the AI.
class GameLogic {
  static PlayerType? playerWon(List<Checker> checkers) {
    if (checkers.any((Checker element) =>
        element.type == PlayerType.CAT && element.coordinate.y == 0)) {
      return PlayerType.CAT;
    }
    if (possibleMoves(
            checkers.firstWhere(
                (Checker element) => element.type == PlayerType.CAT),
            checkers)
        .isEmpty) {
      return PlayerType.MICE;
    }
    return null;
  }

  static List<Coordinate> possibleMoves(
      Checker checker, List<Checker> checkers) {
    final List<Coordinate> coordinates = [];
    coordinates
        .add(Coordinate(checker.coordinate.x + 1, checker.coordinate.y + 1));
    coordinates
        .add(Coordinate(checker.coordinate.x - 1, checker.coordinate.y + 1));
    if (checker.type == PlayerType.CAT) {
      coordinates
          .add(Coordinate(checker.coordinate.x + 1, checker.coordinate.y - 1));
      coordinates
          .add(Coordinate(checker.coordinate.x - 1, checker.coordinate.y - 1));
    }
    return coordinates
        .where((Coordinate element) => element.x >= 0 && element.x <= 8)
        .where((Coordinate element) => element.y >= 0 && element.y <= 8)
        .where((Coordinate element) =>
            !checkers.any((Checker check) => element == check.coordinate))
        .toList();
  }
}
If there is a winner, the board game view model has access to the routing service to show a dialog. Since the default dialog from GetX requires some information about to display, I have some Widgets in this service. I will probably extract this later, as I would like to keep the UI separated from this service, but I will leave it here for now as I do not want the route management to happen in other places. The best way to do this is to implement the dialog and activate the dialog with Get.dialog(DialogWidget()).
class RoutingService {
void toBoardGame(AISettings? aiSettings) {
Get.off(() => BoardPage(BoardPageInput(aiSettings)));
}
void toAbout() {
Get.to(() => AboutPage());
}
void toGameMenu() {
Get.to(() => GameMenuPage());
}
void back() {
Get.keys.forEach((key, value) {
print(value);
});
Get.back();
}
void openPlayerDialog(PlayerType playerType) {
String winner = playerType == PlayerType.MICE ? "Mice" : "Cat";
Get.defaultDialog(
title: "$winner won the game",
textCancel: "Back to menu",
onCancel: () {
Get.offAll(() => MainMenuPage());
},
textConfirm: "Play Again",
confirmTextColor: Colors.white,
content: Container(),
onConfirm: () {
Get.back();
},
);
}
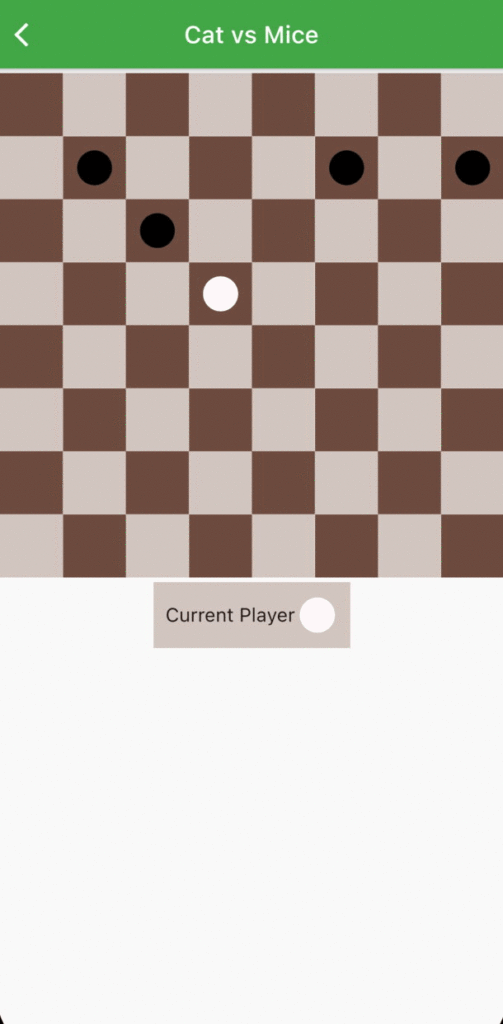
}Since the state is accessible to the providers, it is straightforward to add new Widgets to the page without passing the state to other Widgets. For example, I think it would be nice to see the current player below the game board. When playing against myself, I sometimes forget which checker I should move. The CurrentPlayerWidget can access the current player through the provider and display the correct color. After which, I can add it to the board game page.
class CurrentPlayerWidget extends HookWidget {
  @override
  Widget build(BuildContext context) {
    final player = useProvider(currentPlayer);
    return Row(
      children: [
        Expanded(flex: 1, child: Container()),
        Container(
          color: Colors.brown[100]!,
          padding: EdgeInsets.all(10),
          child: Row(
            mainAxisAlignment: MainAxisAlignment.center,
            children: [
              Text(
                "Current Player",
                style: TextStyle(fontSize: 16),
              ),
              Icon(
                Icons.circle,
                color: player == PlayerType.MICE ? Colors.black : Colors.white,
                size: 35,
              ),
            ],
          ),
        ),
        Expanded(flex: 1, child: Container()),
      ],
    );
  }
}
All those changes result in the following demo:
In the next post, I will describe the implementation of artificial intelligence. This will be a difficult part of the application, so maybe I will discuss the implementation of artificial intelligence in multiple blog posts. If you want to follow along, I will publish my updates on Twitter. In addition, you can see my progress on the code on Github.