In this weekly blog series about Cat and Mice, I will discuss the whole process, from design to implementation, from publishing to artificial intelligence. Cat and Mice is a game that is played on a checkers board. One player plays the cat and has only one piece. The piece of this player starts at one side of the checker’s board. On the other side are four pieces of the mice. The goal for the cat is to reach the other side of the checker’s board. The goal for the mice is to prevent this. This fourth article will discuss the implementation of the computer player.
About this blog series
This blog series will follow me along in the making of a simple game with Flutter. Not just the technical parts but also everything that happens around the implementation.
Using the minimax algorithm
The minimax is an algorithm that is used for the computation of the best possible move. There are a few requirements for the basic algorithm. Most importantly, the game should contain no random elements and should contain no loops. Luckily, the game does fulfill this condition. I will not go into details about the algorithm as there are many great explanations of the algorithm. For example, you can look at the explanation on Wikipedia. This is also where I got the following pseudocode:
function minimax(node, depth, maximizingPlayer) is
    if depth = 0 or node is a terminal node then
        return the heuristic value of node
    if maximizingPlayer then
        value := −∞
        for each child of node do
            value := max(value, minimax(child, depth − 1, FALSE))
        return value
    else (* minimizing player *)
        value := +∞
        for each child of node do
            value := min(value, minimax(child, depth − 1, TRUE))
        return value
First, let’s create the node. The state of our game depends on the position of the checkers. The current player is passed to the function as minimizing or maximizing player. There is also a copy function to make the next node.
class Node {
  final List<Checker> checkers;

  Node(this.checkers);

  Node copy(Move move) {
    final checkers = [
      for (final checker in this.checkers)
        if (checker == move.checker)
          checker.copyWith(coordinate: move.coordinate)
        else
          checker,
    ];
    return Node(checkers);
  }
}
This is the move class, and this is what the result should be of the minimax algorithm. If we only return the value, the AI still does not know which move to choose.
class Move {
  final Checker checker;
  final Coordinate coordinate;

  Move(this.checker, this.coordinate);
}
So the result is a combination of a move and a value. The value is to determine which action has the best result. I need the move to pick the corresponding move.
class Result {
  final Move? move;
  final int value;

  Result(this.move, this.value);
}
Now, if we compare our code with the pseudocode from Wikipedia, the biggest difference is that the minimax algorithm also returns the move. Without this move, the algorithm is pretty useless as the only result will be the max or min that the player can score.
Result minimax(Node node, int depth, bool maximizingPlayer) {
final winner = GameLogic.playerWon(node.checkers);
if (depth == 0 || winner != null) {
return computeScore(winner);
}
if (maximizingPlayer) {
int value = -1000;
Iterable<Move> moves = computeCatMoves(node);
Move? bestmove;
for (var move in moves) {
var result = minimax(node.copy(move), depth - 1, !maximizingPlayer).value;
if (result > value) {
value = result;
bestmove = move;
}
}
return Result(bestmove, value);
} else {
int value = 1000;
List<Move> moves = computeMiceMoves(node);
Move? bestmove;
for (var move in moves) {
var result = minimax(node.copy(move), depth - 1, !maximizingPlayer).value;
if (result < value) {
value = result;
bestmove = move;
}
}
return Result(bestmove, value);
}
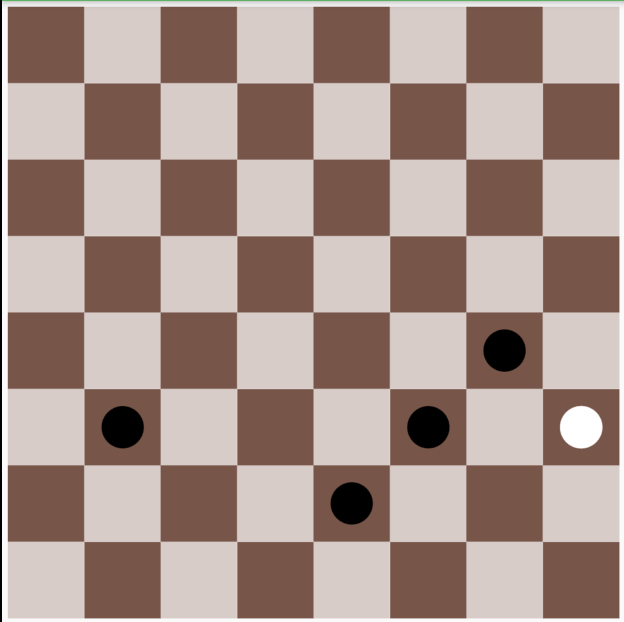
}Let’s check if it works. In this case, the cat is already past the mice. Thus the cat only has to move forward. The reason for this is that the algorithm is quite slow, which I will discuss later. Because the algorithm is quite slow, there is only a low depth that the algorithm can compute in a reasonable time. The test has the coordinate of the next move. I started to think about this with the cat player in mind. Thus, at first, I only included the coordinate we were to move to since there is only one checker. However, this does not work for the mice as there can be cases where two mice can move to the same square.
void main() {
  test('Counter value should be incremented', () {
    final aiService = AIService(null);

    final checkers = [
      Checker(1, PlayerType.MICE, new Coordinate(0, 6)),
      Checker(2, PlayerType.MICE, new Coordinate(2, 6)),
      Checker(3, PlayerType.MICE, new Coordinate(4, 6)),
      Checker(4, PlayerType.MICE, new Coordinate(6, 6)),
      Checker(5, PlayerType.CAT, new Coordinate(5, 2))
    ];

    final node = Node(checkers);
    final result = aiService.minimax(node, 8, true);
    print(result.value);
    print(result.move?.coordinate.x);
    print(result.move?.coordinate.y);
    print(result.move?.checker.type);
  });
}
Alpha Beta Pruning
Alpha-beta pruning can speed up the minimax algorithm. The goal of the alpha-beta pruning is to prevent the searching of nodes that are never going to be chosen. For the exact details, you can look at the explanation on Wikipedia. This is also where I got the following pseudocode:
function alphabeta(node, depth, α, β, maximizingPlayer) is
    if depth = 0 or node is a terminal node then
        return the heuristic value of node
    if maximizingPlayer then
        value := −∞
        for each child of node do
            value := max(value, alphabeta(child, depth − 1, α, β, FALSE))
            if value ≥ β then
                break (* β cutoff *)
            α := max(α, value)
        return value
    else
        value := +∞
        for each child of node do
            value := min(value, alphabeta(child, depth − 1, α, β, TRUE))
            if value ≤ α then
                break (* α cutoff *)
            β := min(β, value)
        return value
The biggest difference is passing the alpha and beta to the method. For the maximizing player, this means that when the value is larger than beta, it can skip that branch. This might seem strange at first, but the minimizing player can get a lower maximum value when choosing the other branch.
For example, the minimizing player has three options. The minimizing player will always pick the option with the lowest maximum value. All branches of option 1 are computed, and the maximum value here is 8. Now the maximizing player will compute the maximum value for option 2. This will get a beta of 8 since that is the lowest possible value the minimizing player can get so far. If the first branch of option 2 results in a maximum value of 10, then the minimizing player will never pick option 2. This means there is no need to go over the other branches of option 2 to check if there might be a higher value.
  Result alphaBeta(Node node, int depth, int alpha, int beta, bool maximizingPlayer) {
    final winner = GameLogic.playerWon(node.checkers);
    if (depth == 0 || winner != null) {
      return computeScore(winner);
    }
    if (maximizingPlayer) {
      int value = -1000;
      Iterable<Move> moves = computeCatMoves(node);
      Move? bestmove;
      for (var move in moves) {
        var result = alphaBeta(
                node.copy(move), depth - 1, alpha, beta, !maximizingPlayer)
            .value;
        if (result > value) {
          value = result;
          bestmove = move;
        }
        if (value > beta) {
          return Result(bestmove, value);
        }
        alpha = max(value, alpha);
      }
      return Result(bestmove, value);
    } else {
      int value = 1000;
      List<Move> moves = computeMiceMoves(node);
      Move? bestmove;
      for (var move in moves) {
        var result = alphaBeta(
                node.copy(move), depth - 1, alpha, beta, !maximizingPlayer)
            .value;
        if (result < value) {
          value = result;
          bestmove = move;
        }
        if (value < alpha) {
          return Result(bestmove, value);
        }
        beta = min(value, beta);
      }
      return Result(bestmove, value);
    }
  }
This might still seem unclear, but just like with the minimax algorithm, there are already many great articles describing the algorithm in more detail. For example, this article walks through the alpha-beta pruning step by step with actual values.
Problems
There are two problems with this approach. The first being the performance. Even with the alpha-beta optimization calculating a lot of moves ahead takes a lot of time. A way to improve this is by doing another evaluation at a lower depth. For example, the cat may have a way through the wall of the mice. This should get the same score as actually winning the game. However, in a lot of situations, it is not clear who is going to win. So, we would determine a score for those situations to make it work.

There is another problem. When played correctly, the mice will always win the game. In this case, the result of each step for the cat player will be the same because the value of the algorithm will give a loss for each move. This means the cat will take random moves with our approach. In the next blog post, I will try another approach by taking heuristic moves from the start.
Improving the game
When creating the AI, two things annoyed me. First, if the cat gets through the wall of the mice, the mice cannot do anything more than move and wait till the cat wins. For this, I would like to implement a restart button. Another thing that was annoying, that just after making a mistake, I realized I had lost the game. For this, I will add an undo button. This is extremely handy during testing. However, I will probably disable this when playing against another player to keep the game fair.
Implementing the restart button
First, the restart button. This is pretty easy to implement. There already is a restart function for restarting after the player finishes the game. I can add a button that calls this method on the view model.
class RestartWidget extends HookWidget {
@override
Widget build(BuildContext context) {
final viewModel = useProvider(boardGameViewModel);
return ElevatedButton(
onPressed: () {
viewModel.restart();
},
child: Padding(
padding: const EdgeInsets.all(12.0),
child: Row(
children: [
Icon(
Icons.replay,
size: 20,
),
Text("Restart"),
],
),
),
);
}
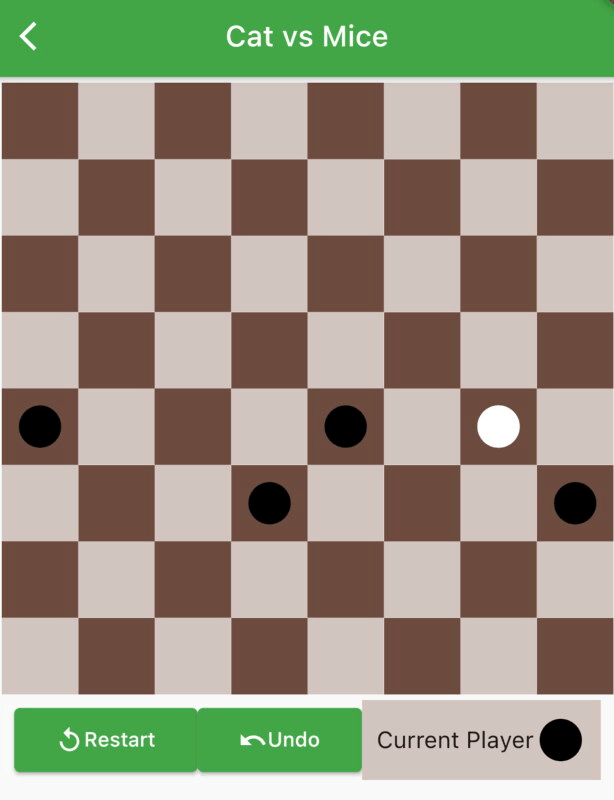
}The restart button in action:
Implementing the undo button
The undo button is more work, but this is still pretty easy to implement because of the setup of the application. For this, I will work with commands. There is only one command that influences the state of the game, the move of a checker. To record this, I need to know the origin and destination of the checker. This way, allows me to place the checker back at the origin.
class MoveCommand {
  final int checkerId;
  final Coordinate from;
  final Coordinate to;

  MoveCommand(this.checkerId, this.from, this.to);
}
I will create a new notifier that acts likes a stack. The view model can push and pop commands from this stack. Furthermore, there is an initialize method that allows the view model to reset the stack when the game is restarted.
class CommandNotifier extends StateNotifier<List<MoveCommand>> {
  CommandNotifier(List<MoveCommand> state) : super(state);

  void initialize() {
    state = [];
  }

  MoveCommand? pop() {
    if (state.isEmpty) {
      return null;
    }
    final command = state.last;
    state = state.whereNot((element) => element == command).toList();
    return command;
  }

  void push(MoveCommand command) {
    state = [...state, command];
  }
}
The board game view model can access the commands notifier in the same way as the previous notifiers for the current player and the current checkers. Since the undo widget will need to know whether there is a move to undo, I provide the canPop Provider, which watches the commands state. The canPop will change to true when the stack is not empty.
final _commands = StateNotifierProvider<CommandNotifier, List<MoveCommand>>(
        (ref) => CommandNotifier([]));

final canPop = Provider((ref) => ref.watch(_commands).isNotEmpty);
final boardGameViewModel = Provider<BoardViewModel>(
  (ref) => BoardViewModel(
      ref.watch(_checkers.notifier),
      ref.watch(_currentPlayer.notifier),
      ref.watch(_commands.notifier),
      ref.watch(routingService)),
);

class BoardViewModel {
  RoutingService _routingService;
  CheckerNotifier _checkersStateNotifier;
  PlayerNotifier _playerNotifier;
  CommandNotifier _commandNotifier;

  BoardViewModel(this._checkersStateNotifier, this._playerNotifier,
      this._commandNotifier, this._routingService);
...

}
Since the board game view model now has access to the commands notifier, he can put the commands on the list. For example, each move will be saved as a move command and pushed on the commands notifier.
void finishDrag(Checker selectedChecker, Coordinate coordinate) {
  if (coordinate != selectedChecker.coordinate) {
    _executeCommand(MoveCommand(
        selectedChecker.id, selectedChecker.coordinate, coordinate));
    final winner = GameLogic.playerWon(_checkersStateNotifier.getCheckers());
    if (winner != null) {
      initialize(null);
      _routingService.openPlayerDialog(winner);
    }
  }
}

void _executeCommand(MoveCommand move) {
  _playerNotifier.updatePlayer();
  _checkersStateNotifier.move(
      _checkersStateNotifier
          .getCheckers()
          .firstWhere((element) => element.id == move.checkerId),
      move.to);
  _commandNotifier.push(move);
}
Now, the undo function is easy to implement. The board game view model retrieves the last move command and reverts the move.
void undo() {
  final moveCommand = _commandNotifier.pop();
  if (moveCommand != null) {
    _playerNotifier.updatePlayer();
    _checkersStateNotifier.move(
        _checkersStateNotifier
            .getCheckers()
            .firstWhere((element) => element.id == moveCommand.checkerId),
        moveCommand.from);
  }
}
To call the undo method, I have added another Widget. This Widget is almost exactly the same as the RestartWidget except that it calls the undo method and the button is disabled when there are no moves to undo.
class UndoMoveWidget extends HookWidget {
@override
Widget build(BuildContext context) {
final undoAllowed = useProvider(canPop);
final viewModel = useProvider(boardGameViewModel);
return ElevatedButton(
onPressed: performUndo(undoAllowed, viewModel),
child: Padding(
padding: const EdgeInsets.all(12.0),
child: Row(
children: [
Icon(
Icons.undo,
size: 20,
),
Text("Undo"),
],
),
),
);
}
VoidCallback? performUndo(bool undoAllowed, BoardViewModel viewModel) {
if (undoAllowed) {
return () => {viewModel.undo()};
}
return null;
}
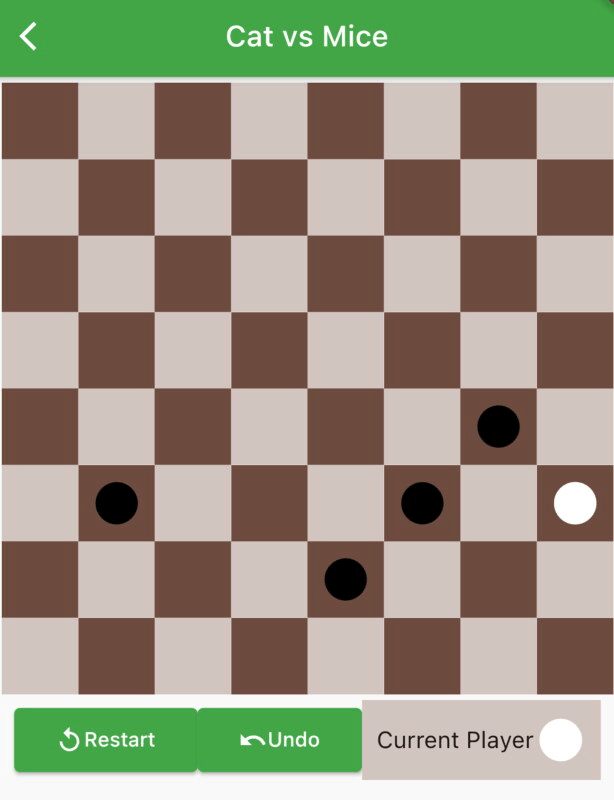
}I am happy with the setup of the architecture of this app. It was not much work to implement the undo and restart button. The widgets are still separated from the logic, and I can keep the widgets small and responsible for only one thing. Here is the undo button in action:
In the next post, I will describe the implementation of artificial intelligence. Furthermore, I will improve the design of the application so that I can create images for beta release. This will be in two weeks since this will be a busy week for me. If you want to follow along, I will publish my updates on Twitter. In addition, you can see my progress on the code on Github.