In this weekly blog series about Cat and Mice, I will discuss the whole process, from design to implementation, from publishing to artificial intelligence. Cat and Mice is a game that is played on a checkers board. One player plays the cat and has only one piece. The piece of this player starts at one side of the checker’s board. On the other side are four pieces of the mice. The goal for the cat is to reach the other side of the checker’s board. The goal for the mice is to prevent this. This second article will discuss the architecture of the App.
About this blog series
This blog series will follow me along in the making of a simple game with Flutter. Not just the technical parts but also everything that happens around the implementation.
Architecture
In this blog post, I will discuss some of the architecture choices that influence the creation of the application. First, I describe how I plan to deal with navigation between pages. After that, I will take a deeper look at how to approach the state management of the pages.
Navigation
The navigation will be based on GetX route management. This library provides many options for route management, but I will use this library because we do not need the context to navigate to other pages. For route management, we add a service that will help us navigate to the correct pages.
final routingService = Provider<RoutingService>((ref) => RoutingService());

class RoutingService {
  void toBoardGame(AISettings? aiSettings) {
    Get.to(() => BoardPage(BoardPageInput(aiSettings)));
  }

  void toSettings() {
    Get.to(() => SettingsPage());
  }

  void toAbout() {
    Get.to(() => AboutPage());
  }

  void toGameMenu() {
    Get.to(() => MainMenuPage());
  }
}
The service is a Riverpod provider. The RoutingService contains all the routing to different pages. Since it is a Riverpod provider, we can access this Routing Service in each view model ( I will discuss this further in the next section). This way, all the routing happens through the view models and none of it in the Widgets.
I am not completely sure how this approach would hold with authentication wrapped around some of the Widgets, but I think that would need some changes. Probably make an abstract Widget for the non-authenticated pages and an abstract Widget for the pages that do need authentication. This abstract Widget will hold the logic for displaying the login page when the user is not authenticated. Luckily I do not need authentication in this local game, but I will get back to this after this blog series.
State management
For the state management, I will use Riverpod, but any other State Management solution can replace this. Another popular solution would be GetX, with which I also have positive experiences. So, let’s discuss how we would like the state management to happen. For each page, I will create a ViewModel. The ViewModel will hold all the business logic so that the Widgets can focus on the UI.
The ViewModel will manage the state in Riverpod Providers. Widgets interested in that state can listen to updates so that when the state of the provider changes, it will send an update to which the Widgets listens. This means that the Widgets will rebuild when such an update arrives.
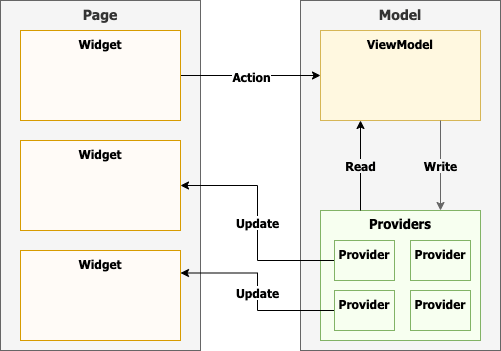
I think the architecture can be best described as Model-View-Update. Here the page is the View. The Page will pass commands to the ViewModel. The ViewModel will update the Providers. So, the providers can be seen as the Model. So if we would wrap this in a flow diagram, it should look like this:

This all looks great, but let’s start with some coding. I have not applied state management in the same way before. So, I will come back to this later with the pros and cons.
First, the view model. The view model is a simple class that manages the possibles action taken in the main menu. For now, there is only one action, to go to a different page. To execute this action, we will need the routing service, which we can provide by watching the routing service and creating the view model. Therefore, the view model itself is available as a provider for the main menu page.
final mainMenuViewModel = Provider<MainMenuViewModel>(
(ref) => MainMenuViewModel(
ref.watch(routingService),
),
);
class MainMenuViewModel {
RoutingService _routingService;
MainMenuViewModel(this._routingService);
void toPage(MenuOption option) {
switch (option) {
case MenuOption.GAME:
_routingService.toBoardGame(null);
break;
case MenuOption.ABOUT:
_routingService.toAbout();
break;
case MenuOption.SETTINGS:
_routingService.toSettings();
break;
}
}
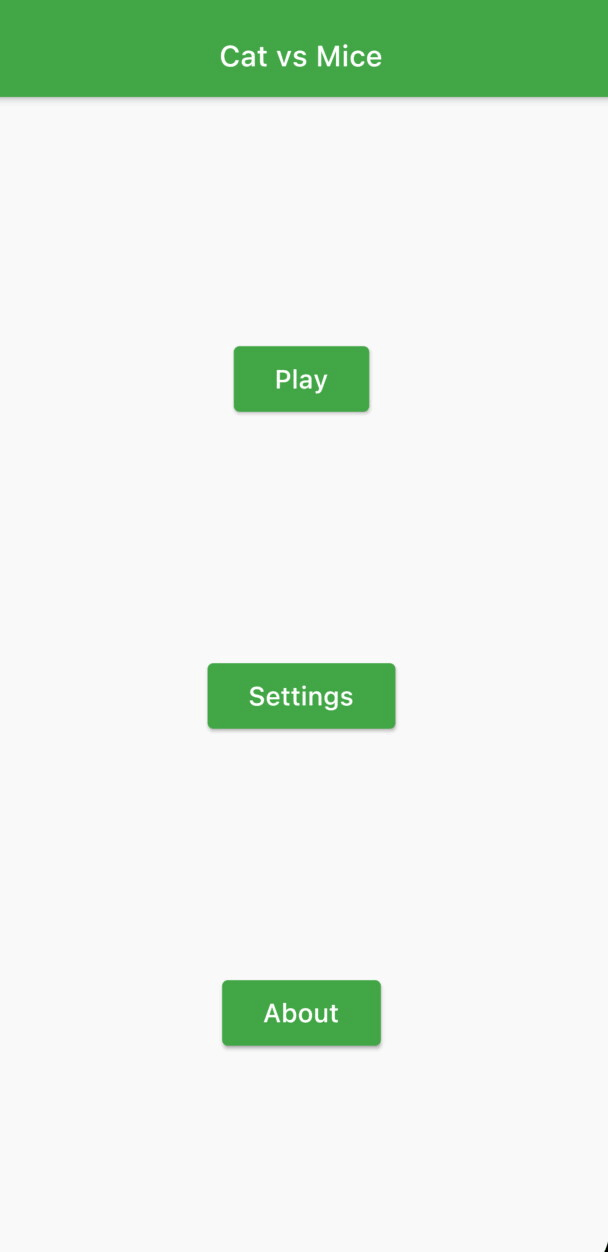
}The main menu page is just a few simple buttons for now. The buttons are ElevatedButton, which on pressed will let the view model know which action it wants to execute, which is to go to a different page.
class MainMenuPage extends StatelessWidget {
  @override
  Widget build(BuildContext context) {
    return Center(
      child: Column(
        mainAxisAlignment: MainAxisAlignment.spaceEvenly,
        children: [
          MenuItem("Play", MenuOption.GAME),
          MenuItem("Settings", MenuOption.SETTINGS),
          MenuItem("About", MenuOption.ABOUT),
        ],
      ),
    );
  }
}

class MenuItem extends HookWidget {
  final String name;
  final MenuOption option;
  const MenuItem(this.name, this.option);

  @override
  Widget build(BuildContext context) {
    final viewModel = useProvider(mainMenuViewModel);
    return ElevatedButton(
        onPressed: () {
          viewModel.toPage(option);
        },
        child: Padding(
          padding: const EdgeInsets.all(12.0),
          child: Text(
            name,
            style: TextStyle(fontSize: 18),
          ),
        ));
  }
}
The Board Game Page
The basics of the game is a board game. So, I will use the code in this blog post as the base for implementing the game. I will adjust the game so that the view model of the board game is more in line with that of the main menu.
After adjusting the code from the blog post above, this is the current state of the application. For now, there is the main menu. From the main menu, it is possible to go to the game board by clicking play. The other two menus are not accessible yet. When clicking play, it is possible to move back to the main screen by the default navigation options.
In the next post, I will describe the implementation of the game logic, and then we hopefully have a game we can play. After that, I will focus mainly on how to separate the game logic from the Widgets. If you want to follow along, I will publish my updates on Twitter. In addition, you can see my progress on the code on Github.
What is exactly your concern about the Authentication part?
You can make `RoutingService` depend on the authentication service and force navigation to the login screen (or no navigation at all) if the user is not authenticated.
Yeah, you are right! I was thinking a little bit too complicated here.
Oh btw, you are a constant presence in my weekly newsletter 🙂 https://ishouldgotosleep.com/this-week-in-flutter-11/