In this blog series about Cat and Mice, I will discuss the whole process, from design to implementation, from publishing to artificial intelligence. Cat and Mice is a game that is played on a checkers board. One player plays the cat and has only one piece. The piece of this player starts at one side of the checker’s board. On the other side are four pieces of the mice. The goal for the cat is to reach the other side of the checker’s board. The goal for the mice is to prevent this. This article will describe how to add sound to your app, and how to enable/disable the sound through the preferences.
About this blog series
This blog series will follow me along in the making of a simple game with Flutter. Not just the technical parts but also everything that happens around the implementation. I started off with a weekly series but after another Flutter project, I am back to finish the series.
Adding sound
To play the sound, I am using the audioplayers package. Through the shared preferences the app can maintain preferences through restarts. This way users do not have to disable the sound each time they are opening the app. So, let’s get started with installing the package.
flutter pub add shared_preferencesThe package still needs some reference to the audio files. So there is another change that needs to be done in the pubspec.yaml. Under the assets, there needs to be a reference to the place where the audio files are stored. Since the path ends with a /, all files in that directory can be used.
flutter:
  uses-material-design: true
  assets:
    - assets/audio/
To play the sounds, the application needs an AudioCache. ThisAudioCache can be initialized with the prefix to the files. This way, when the application wants to play a file, the only thing it needs is the filename.
final soundService = Provider<SoundService>((ref) => SoundService(
    AudioCache(prefix: 'assets/audio/', fixedPlayer: AudioPlayer()..setReleaseMode(ReleaseMode.STOP)),
    ref.watch(preferenceService)));

class SoundService {
  final AudioCache _audioCache;
  final PreferenceService _preferenceService;

  SoundService(this._audioCache, this._preferenceService);

  void playWinSound() {
    _audioCache.play("win.wav");
  }

  void playLoseSound() {
    _audioCache.play("loss.wav");
  }

  void playMoveSound() {
    _audioCache.play("move.mp3");
  }
}
Now, this service is ready for use. This can be injected like all of the other services. During the execution of the command, the move sound will play.
  void _executeCommand(MoveCommand move) {
    _soundService.playMoveSound();
    _playerNotifier.updatePlayer();
    _checkersStateNotifier.move(
        _checkersStateNotifier.getCheckers().firstWhere((element) => element.id == move.checkerId), move.to);
    _commandNotifier.push(move);
    checkWinningConditions();
    moveAIIfNeeded();
  }
Enable and disable the sound
To enable and disable the sound, I am using the shared preferences. Through the shared preferences the app can maintain preferences through restarts. This way users do not have to disable the sound each time they are opening the app. So, let’s get started with installing the package.
flutter pub add shared_preferencesDo not forget to reinstall the app on the emulator ( or your actual phone). Otherwise, you might get the same MissingPluginException as me. Luckily, I am also not the first one to encounter this exception. So I did not spend too much time on this, thanks to StackOverflow.
Just like the sound service, I create another service for the preferences, that is provided to the view models and other services.
final preferenceService = Provider<PreferenceService>((ref) => PreferenceService());

class PreferenceService {
  SharedPreferences? _sharedPreferences;

  PreferenceService() {
    SharedPreferences.getInstance().then((value) {
      _sharedPreferences = value;
    });
  }

  updateSoundEnabled(bool soundEnabled) {
    _sharedPreferences!.setBool("SOUND_ENABLED", soundEnabled);
  }

  bool isSoundEnabled() {
    return _sharedPreferences?.getBool("SOUND_ENABLED") ?? false;
  }
}
The preference service can be injected into the sound service. This way the sound service can determine whether or not the sound should be played when one of the play methods is called.
final soundService = Provider<SoundService>((ref) => SoundService(
    AudioCache(prefix: 'assets/audio/', fixedPlayer: AudioPlayer()..setReleaseMode(ReleaseMode.STOP)),
    ref.watch(preferenceService)));

class SoundService {
  final AudioCache _audioCache;
  final PreferenceService _preferenceService;

  SoundService(this._audioCache, this._preferenceService);

  void playWinSound() {
    if (_preferenceService.isSoundEnabled()) {
      _audioCache.play("win.wav");
    }
  }

  void playLoseSound() {
    if (_preferenceService.isSoundEnabled()) {
      _audioCache.play("loss.wav");
    }
  }

  void playMoveSound() {
    if (_preferenceService.isSoundEnabled()) {
      _audioCache.play("move.mp3");
    }
  }
}
To update the preferences I use this simple Widget in the AppBar. Here the user can toggle the preferences of the sound. The sound controller is a simple notifier that has access to the preference service, in the same way, the sound service had access to the preference service.
class SoundWidget extends HookWidget {
  const SoundWidget({Key? key}) : super(key: key);

  @override
  Widget build(BuildContext context) {
    final enabled = useProvider(soundController);
    final controller = useProvider(soundController.notifier);
    return IconButton(
      onPressed: () => controller.toggle(),
      icon: Icon(enabled == true ? Icons.music_note_sharp : Icons.music_off),
    );
  }
}
UX improvements
There were also many small design improvements. Since most of those changes are not really special, I will not do a deep dive into them. Some of the changes:
- Removed the main settings screen, as the only useful options was to go to the game settings screen
- Added shadows to the checkers
- Delayed the move of the AI player
But most importantly, I do not expect everyone to know the rules of the game. So, I have added a description of the rules with a stepper. Each step explains a part of the game. For, example the possible moves of the mice player:
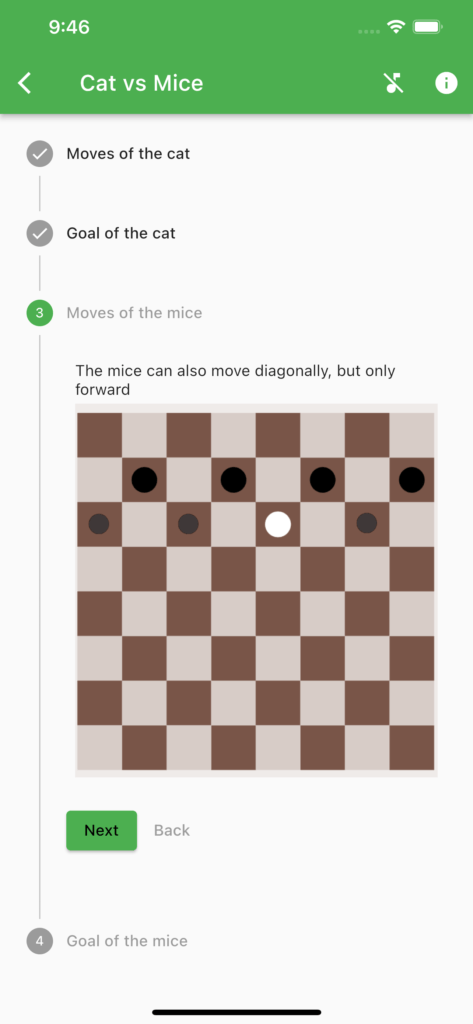
As in most games, I will ask the player a question before he starts his first game whether he wants to read the rules first. This is again saved in the shared preferences so that the players do not have to answer that question multiple times.
In the next blog post, I will show you how to add some tests, and how to automate the creation of screenshots. If you want to follow along, you can see my progress on the code on Github.